
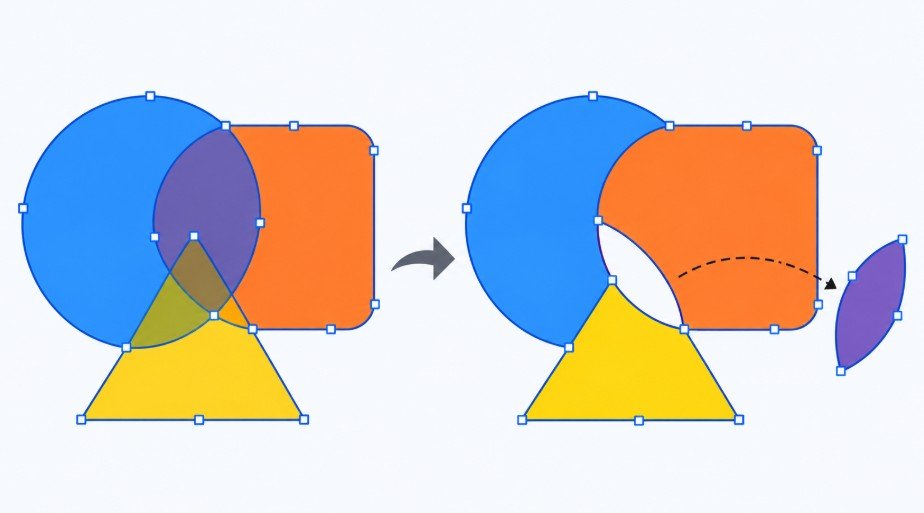
Learning how to use the Shape Builder tool in Illustrator makes creating professional vector designs much easier. Simply select overlapping shapes, press Shift + M, and drag across regions to merge them. To erase unwanted sections, hold Alt on Windows or Option on Mac while clicking or dragging.
When I started exploring Illustrator’s vector editing features, I realized that mastering Shape Builder could simplify everything from custom icons to complex logos. Instead of manually adjusting dozens of anchor points, I could transform basic geometric objects into unique designs.
In this guide, I’ll walk you through the essential steps, keyboard shortcuts, advanced settings, and troubleshooting methods that make this tool valuable for beginners and experienced designers.
What Is the Shape Builder Tool in Adobe Illustrator?
The Shape Builder Tool is a vector editing feature that combines, separates, or removes sections of selected shapes.
It works by identifying regions formed when vector paths overlap. You can then merge those regions, extract individual sections, or delete unwanted areas.
For example, overlapping two circles creates separate regions that you can manipulate independently.
I find this particularly helpful when designing business logos, website icons, social media graphics, and printable artwork.
Unlike manually editing paths with the Pen Tool, Shape Builder provides a visual approach to creating custom shapes in Illustrator.
Beyond manual shape editing, Illustrator also includes AI-powered features that can streamline creative tasks. Explore AI tools in Adobe Illustrator to discover how these capabilities can support vector design and improve your overall workflow.
Where Is the Shape Builder Tool in Illustrator?
You can find Shape Builder in Illustrator’s toolbar. Its icon displays overlapping shapes with a pointer.
If the tool isn’t visible, navigate to Window > Toolbars > Advanced to display additional tools.
What Is the Shortcut for Shape Builder in Illustrator?
Press Shift + M on either Windows or macOS to activate the Shape Builder Tool.
Before using it, select your artwork with the Selection Tool (V).
Once activated, Shape Builder highlights available regions when you hover over the selected shapes.
This shortcut saves time when switching between drawing and editing operations.
To speed up your overall design workflow, you can also refer to this Illustrator shortcuts cheat sheet for useful keyboard commands that make switching between tools and performing common editing tasks more efficient.
How Do You Use Shape Builder in Illustrator Step by Step?

If you’re practicing how to use shape builder tool in Illustrator, I recommend starting with two overlapping circles.
Step 1: Draw and Select Overlapping Shapes
Open Illustrator and create a document.
Select the Ellipse Tool (L) and draw two circles that partially overlap. Apply different fill colors so you can distinguish the objects.
Press V to activate the Selection Tool, then select both circles by dragging a selection box around them or Shift-clicking each one.
Step 2: Activate Shape Builder
Press Shift + M or select the tool from the toolbar.
Move your cursor over the overlapping artwork. Illustrator highlights the regions available for editing.
Step 3: Merge Shapes by Dragging
Click and drag across two or more connected regions.
Illustrator previews the areas being combined. Release your mouse button to merge them into one shape.
This method is useful when you need to merge multiple shapes in Illustrator without manually modifying their anchor points.
Step 4: Extract or Split Individual Regions
To divide shapes in Illustrator, click once inside an enclosed region without dragging.
This separates the chosen region from adjacent areas, allowing you to manipulate it independently.
Switch to the Selection Tool to move or recolor the resulting object.
Step 5: Erase Unwanted Areas
Hold Alt on Windows or Option on macOS while using Shape Builder.
Your cursor displays a minus sign, indicating erase mode.
Click an unwanted region to remove it. You can also hold the modifier key and drag across multiple regions or edges to delete them efficiently.
This technique works particularly well when creating cutouts, curved symbols, and geometric illustrations.
Adobe Help Center+1
How Do You Customize Shape Builder Tool Settings?
Shape Builder includes options that control how Illustrator detects gaps, applies colors, and highlights regions.
Double-click the tool icon in the toolbar to open its settings. You can also press Enter on Windows or Return on Mac while the tool is active.
How Do You Enable Gap Detection?
Gap Detection helps Illustrator recognize regions formed by paths with small openings.
Enable the feature in Shape Builder Tool Options and adjust the gap length to suit your artwork.
I recommend checking this setting when overlapping paths aren’t behaving as expected.
Can You Change Colors Using Shape Builder?
Yes. Shape Builder offers color-selection options that let you apply colors while creating regions.
Depending on your settings, you can work with colors from existing artwork or choose from available swatches.
This feature simplifies multicolored vector illustrations and reduces unnecessary switching between tools.
Adobe Help Center+1
Shape Builder vs. Pathfinder: Which Should You Use?
Both tools help you combine shapes in Illustrator, but their workflows differ.
Shape Builder provides direct control over individual overlapping regions. You decide exactly which sections to merge, extract, or erase.
Pathfinder uses predefined operations such as Unite, Minus Front, Intersect, and Divide to modify selected objects.
I prefer Shape Builder for detailed logo design and custom icons because it allows more interactive editing.
However, Pathfinder can be faster when applying a specific operation to an entire selection.
Why Is the Shape Builder Tool Not Working?
Shape Builder problems usually involve object selection, incompatible artwork, or path alignment.
Why Can’t I Merge My Shapes?
Check that you’ve selected all necessary vector objects before activating the tool.
Also, verify that your artwork isn’t locked or hidden. If you’re using a raster image, such as a JPG or PNG, convert the required artwork into editable vector paths first.
Why Are Overlapping Regions Not Appearing?
Inspect the position of your objects and confirm their paths intersect as intended.
If small gaps are preventing region detection, enable Gap Detection in the tool settings.
For more precise corrections, use the Direct Selection Tool to adjust anchor points.
How Do You Clean Up Vector Shapes After Using Shape Builder?
After editing vector artwork, I recommend checking for stray anchor points, unnecessary paths, and overlapping objects.
Navigate to Object > Path > Clean Up to remove unwanted elements such as stray points and empty text paths.
Next, select the relevant artwork and choose Object > Path > Simplify to reduce excessive anchor points while preserving the shape’s appearance.
This cleanup process is especially important when preparing logos, CNC designs, or laser-cutting files.
For fabrication projects, also verify that paths are properly closed, correctly joined, and compatible with the cutting equipment.
Adobe Help Center+2
How Can You Create a Simple Logo With Shape Builder?

One beginner-friendly project I recommend is creating a cloud icon.
If you’re interested in applying similar techniques to complete logo projects, this step-by-step guide on how to make logo in Illustrator explains how to create professional logo designs using Illustrator’s vector tools.
Draw three overlapping circles and place a rectangle underneath them to form a flat base.
Select all objects, activate Shape Builder, and drag across the regions you want to combine.
Use Alt or Option to remove unnecessary sections, then apply your preferred fill color.
You now have a customizable vector icon that can be resized without losing quality.
The same process works for badges, decorative graphics, and minimalist business logos.
Frequently Asked Questions
1. Can Shape Builder Cut Shapes in Illustrator?
Yes. Hold Alt on Windows or Option on Mac while clicking or dragging across unwanted regions to remove them.
2. Does Shape Builder Work With Open Paths?
Yes, Shape Builder can work with selected open paths. However, the available operations depend on path geometry and tool settings.
3. Can I Use Shape Builder on a PNG Image?
Not directly. You must convert the raster artwork into editable vector paths before using Shape Builder.
4. Is Shape Builder Better Than the Pen Tool?
Shape Builder is usually easier for combining existing geometric shapes. The Pen Tool provides greater control when drawing custom paths and curves from scratch.
Final Thoughts
Mastering how to use the Shape Builder tool in Illustrator can make vector editing faster, cleaner, and more enjoyable.
I recommend practicing with basic circles, rectangles, and triangles before moving into complex illustrations. Once you’re comfortable merging, splitting, erasing, and cleaning up shapes, you can apply those skills to professional logos, icons, and print-ready designs.
With regular practice, Shape Builder can become one of the most useful tools in your Illustrator workflow.